
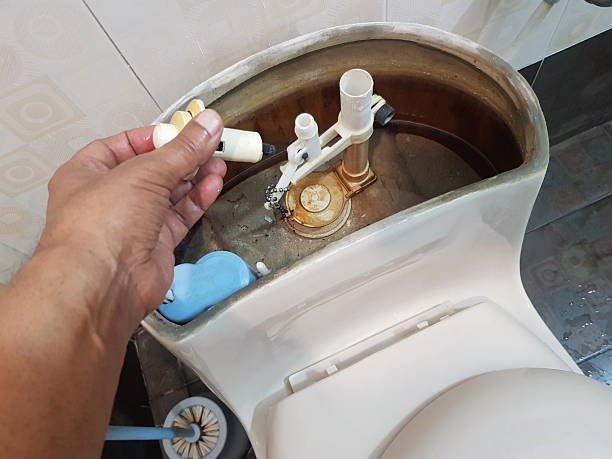
You may not need a plumber or a new toilet. Sometimes replacing the parts inside the tank is all it takes.
Have you ever heard your toilet running long after you’ve flushed it?
Maybe you hear water trickling in the bathroom when nobody has used the toilet. Or perhaps the toilet seems to refill itself every few minutes.
It’s a common household problem, especially in older homes.
The good news is that many running-toilet problems can be repaired without replacing the toilet or paying for an expensive service call.
And for homeowners who enjoy taking care of their own homes, it’s one of those repairs that can provide a real sense of satisfaction.
At 79, I’ve learned that staying independent doesn’t mean doing everything yourself. It means knowing which jobs you can safely handle and when it’s smarter to ask for help.
Today, I want to share a practical approach to repairing a running toilet by replacing the working parts inside the tank.
Why Does a Toilet Keep Running?
Before buying replacement parts, remove the tank lid and take a look. Sometimes the chain is tangled, the flapper isn’t closing properly, or the water level is simply too high. A small adjustment may be all that’s needed.
Before replacing anything, it helps to understand what’s happening.
Inside most conventional toilet tanks are several components that control how water enters, fills, and leaves the tank.
Over time, these parts can wear out.
Three common trouble spots are:
1. The flapper
The flapper is a rubber seal at the bottom of the tank. When you flush, it lifts and allows water to flow into the bowl.
If it becomes worn, warped, or covered with mineral deposits, it may not seal properly.
Water slowly escapes into the bowl, causing the tank to refill repeatedly.
2. The fill valve
The fill valve controls water entering the tank after a flush.
When it begins to fail, the toilet may continue running, refill unpredictably, or fail to shut off at the correct water level.
3. The flush mechanism and related components
Depending on the toilet design, the flush handle, chain, overflow tube, and other components can also contribute to problems.
Sometimes a simple adjustment solves the problem.
Other times, several aging parts may need attention.
Why I Prefer a Complete Toilet Tank Repair Kit
Over the years, I’ve handled plenty of home maintenance and repair projects.
When dealing with an older toilet that has worn internal components, my preference has often been to replace the working parts together rather than keep repairing individual pieces.
A complete toilet tank repair kit typically includes a fill valve, flapper, and related flush components. Some kits include a flush valve assembly and tank seals as well.
The exact contents vary, so it’s important to choose a kit compatible with your toilet.
Why replace several parts at once?
Because when one component has worn out, others may not be far behind.
Replacing the complete mechanism can give you a fresh start and reduce the likelihood of having to reopen the tank for another repair soon afterward.
However, if a toilet is relatively new and only needs a flapper adjustment or replacement, there’s no reason to replace everything unnecessarily.
The goal isn’t to do the biggest repair. It’s to do the repair that makes sense.
Over the years, I’ve replaced the complete working mechanism inside toilet tanks, including the fill valve and flush valve. One thing I’ve learned from maintaining and repairing properties is that sometimes it makes more sense to replace several aging components together rather than keep fixing one part at a time. But I also believe in using common sense. If a simple adjustment or a new flapper solves the problem, there’s no reason to spend money replacing everything.
Before You Start: Check the Water Shutoff Valve
This is one of the most important parts of the job.
Behind or beside most toilets is a small valve that controls the water supply.
Before attempting a repair, you need to shut off that water.
But there’s something homeowners should understand.
Older shutoff valves can become corroded, stiff, or unreliable.
A valve that hasn’t been touched in years may begin leaking when you try to operate it.
I’ve learned that a simple plumbing repair can quickly become a bigger project if you overlook the condition of the shutoff valve.
Before proceeding:
Inspect the valve and nearby connections for corrosion or moisture.
Gently turn the valve clockwise to shut off the water. Don’t force it.
Flush the toilet and confirm the tank isn’t refilling.
If the valve leaks, won’t turn, or fails to stop the water, don’t disconnect the supply line.
Know where your home’s main water shutoff is located before beginning any plumbing project.
If you’re uncertain about the valve’s condition, calling a plumber is the safer choice.
What You’ll Need
For many conventional toilet tank repairs, you’ll need:
A compatible toilet tank repair kit
An adjustable wrench or suitable pliers
A sponge and small bucket
Old towels
Rubber gloves
The manufacturer’s installation instructions
Depending on your toilet and the kit, additional tools or seals may be required.
Before purchasing a kit, check the toilet model and the size and style of the existing flush valve.
Not every universal kit fits every toilet.
Step 1: Turn Off the Water and Empty the Tank
Start by shutting off the water supply.
Flush the toilet to remove most of the water from the tank.
There will usually be some water remaining at the bottom.
Use a sponge or towel to absorb the remaining water.
Place a bucket and towels beneath the water supply connection to catch any drips.
Never disconnect the supply line until you’ve confirmed the water is shut off.
Step 2: Remove the Old Tank Components
Remove the tank lid and place it somewhere safe.
Tank lids are heavy, and porcelain can crack if dropped.
Look at how the existing parts are installed before removing them. Taking a photograph can be helpful.
Disconnect the water supply line from the fill valve beneath the tank.
Remove the fill valve according to its design.
If you’re replacing the flush valve assembly, you may also need to remove the tank from the toilet bowl to access the mounting hardware and seals.
This is an important distinction: Replacing a flapper or fill valve is generally simpler than replacing the complete flush valve assembly.
If removing the tank is necessary, be careful. Porcelain can crack when hardware is overtightened, and older bolts may be corroded.
Don’t force stuck parts.
Step 3: Install the New Repair Kit
If you’re replacing only the flapper or fill valve, you generally won’t need to remove the tank from the bowl. Replacing the complete flush valve is a bigger job, so check the instructions before deciding how much to replace.
Follow the instructions supplied with your particular kit.
Install the replacement components in the proper order, making sure all gaskets and seals are positioned correctly.
Adjust the fill valve height and float according to the manufacturer’s directions.
If your kit includes a new flush valve, install it with the specified seals and hardware.
If you removed the tank, reinstall it carefully and tighten the mounting bolts evenly, following the manufacturer’s instructions.
Avoid overtightening.
The goal is a secure, watertight installation—not excessive force.
Reconnect the water supply line using the connection method specified by the manufacturer.
Step 4: Turn the Water Back On and Test
After everything appears to be working, dry the connections with a towel and check again for moisture. Look once more later that day to make sure a slow leak hasn’t developed.
Slowly reopen the shutoff valve.
Watch the connections carefully as the tank fills.
Check beneath the tank, around the fill valve, and near any hardware you’ve removed.
Look for dripping or moisture.
The tank should fill to the recommended water level, usually marked on the overflow tube or specified in the instructions.
Flush several times.
The toilet should flush normally, refill, and then stop running.
If water continues entering the overflow tube, the fill level or fill valve may need adjustment.
If water leaks from the tank onto the floor, shut off the supply and investigate before using the toilet again.
A Simple Way to Check for a Hidden Leak
Sometimes a toilet leaks internally without making much noise.
Here’s an easy test.
Put a few drops of food coloring into the tank water.
Don’t flush.
Wait about 15 to 30 minutes.
If colored water appears in the toilet bowl, water is leaking from the tank into the bowl.
That may indicate a problem with the flapper, flush valve seal, or related components.
This simple test can help you identify a problem before wasting more water.
What About Water Leaking Around the Base?
This is a different problem, and it’s worth understanding.
If water appears on the floor around the bottom of the toilet, don’t automatically assume the wax ring has failed.
The water could be coming from the tank, supply connection, condensation, or another source.
A failed wax ring is one possibility, especially when water appears around the base after flushing.
But replacing the wax ring won’t fix a leaking fill valve connection or tank gasket.
Find where the water is coming from before taking the toilet apart.
We’ll cover diagnosing leaks around the toilet base in a separate article.
When Should You Call a Plumber?
There is nothing wrong with deciding a repair isn’t worth the risk.
Consider professional help when:
The water shutoff valve won’t operate or begins leaking.
Tank bolts are badly corroded or difficult to remove.
The toilet or tank is cracked.
Water continues leaking after the repair.
You’re uncomfortable disconnecting plumbing connections or lifting the tank.
You suspect damage to the floor beneath the toilet.
Saving money is important, but preventing water damage and injury is even more important.
Staying Independent After 60
One of the things I enjoy about home improvement is the satisfaction of solving an everyday problem.
I’ve spent many years working on home repairs, and I’ve learned that experience, patience, and common sense can often be more valuable than rushing into a project.
You don’t need to be a professional plumber to understand how a toilet works.
And you don’t need to tackle every repair yourself to remain independent.
Sometimes independence means fixing a problem with your own hands.
Other times, it means recognizing when to call someone who has the right tools and experience.
Both are good decisions.
For those of us over 60, practical home maintenance can help us protect our homes, control expenses, and continue enjoying the places where we spend so much of our lives.
Final Thoughts
A toilet that keeps running may seem like a small annoyance, but it can waste a surprising amount of water over time.
Before replacing the entire toilet or calling for an expensive repair, consider whether the internal components simply need attention.
In an older conventional toilet, installing a compatible complete tank repair kit may be a sensible solution.
Take your time, follow the instructions, and pay particular attention to the condition of the water shutoff valve.
And remember, the best home repair isn’t necessarily the most complicated one.
It’s the one that solves the problem safely and correctly.
At ReinventAfter60.com, I share practical ideas for enjoying life after 60, saving money, staying independent, and making everyday life a little easier.